
Saferpay integration in 5 steps
Get all the information about integrating Saferpay
Competent, reliable, seamless
Step 1: Consultation
Before integrating Saferpay it is important to understand the contractual and technical options as well as in requirements to ensure an optimal integration right from the beginning.
Our technical colleagues will kindly assist you with your contractual and technical enquiries.
Contact our Integration Team for technical consultation on the different integration options that best suit your requirements.
Before contacting the Integration team first have a look at our API documentation to have a general understanding of the Saferpay JSON API.
If possible, please provide the integration team with a detailed description of your intention, requirements and use cases.
Step 2: Testing
Saferpay offers the possibility to test all interfaces beforehand on the Saferpay Test-Environment (Sandbox). You can create a test account which allows you to implement Saferpay into your system and perform test transactions with several payment simulators before going live.
Use the Saferpay Test-Environment to fully test your integration before going live:
You will receive all the required test data via email after successful registration.
After you have received your test account data via email there are two main ways to proceed depending on whether you are using a plugin or whether you use an individual custom integration.
-
If you are using a standard shop system (e.g. Magento, PrestaShop, WooCommerce, etc.), Worldline offers the appropriate plugin.
After successfully installing the plugin, you simply need to enter the provided test credentials into your Saferpay-plugin configuration:
Required Data:
- Test-Customer ID
- Test-Terminal ID (eCommerce Terminal)
- Test JSON API username
- Test JSON API password
! Please make sure that the plugins operation mode is switched to “Test mode”
! Test data: You can use the following test data/card credentials to simulate test transactions: Saferpay Testdata
Plugin test (Example: WooCommerce)
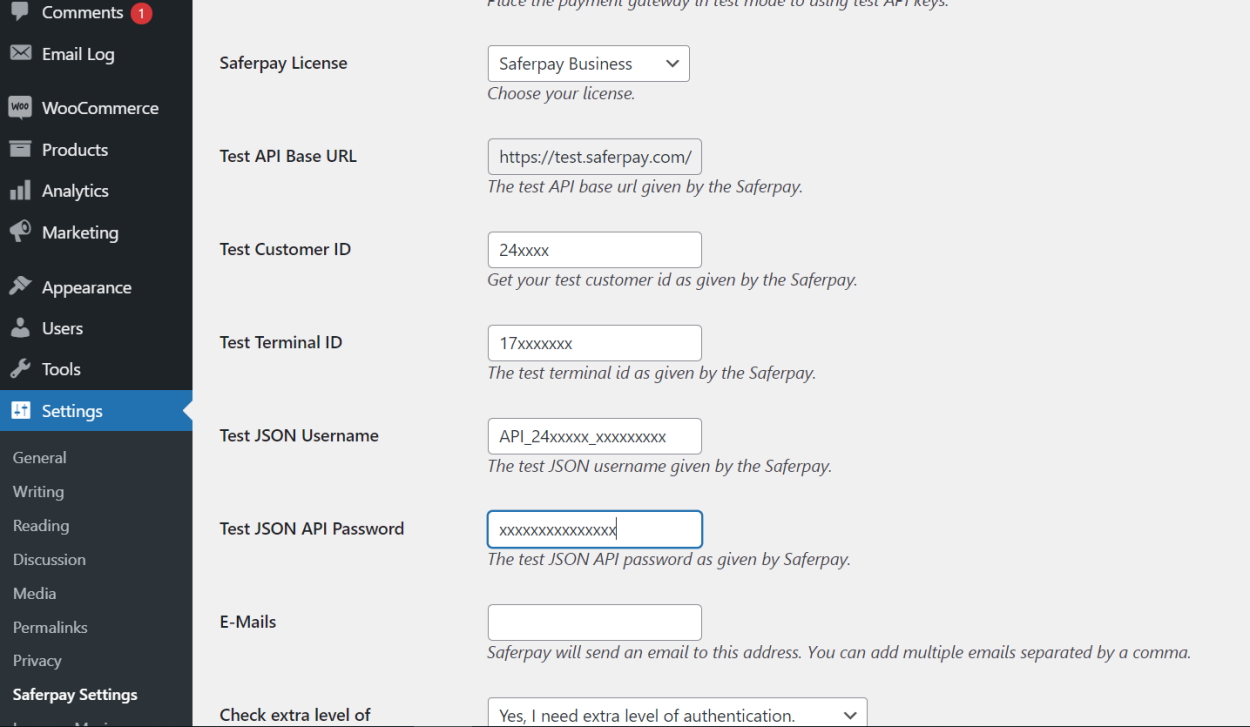
Notice: The above screenshot displays the WooCommerce plugin settings. Other Shop plugins might look different; they however require the same data.
-
You can use the Saferpay JSON API (JavaScript Object Notation Application Programming Interface) to integrate Saferpay into your shop systems, call center solutions, merchandise management, ERP, PMS and CRM systems and other applications in which online payment transactions are processed.
The JSON API Documentation and Specification describes in detail on how to integrate your system with the JSON API.
JSON API Documentation:
Provides detailed explanation on how to integrate the Payment Page Interface and Transaction Interface, optional features, best practices FAQ and more.
Topics:
- Integration Requirements
- Data Security and PCI regulations
- List of Payment Methods and supported features
- Feature List of the two interfaces (Payment Page vs. Transaction Interface)
- Detailed description on the two Interfaces (Payment Page and Transaction interface) and use of Parameters
- Best practice
- Special features/cases
- Activating/Connecting 3rd party Payment methods (Paypal, Sofort, Billpay)
- CSS and IFrame integration
- Mobile App Integration
- Testcards
- FAQ
JSON API Specification:
Technical Specification, with code snippets and Request examples.
Topics:
- Content Encoding
- Authentication
- Error handling
- Server to Sever Code Snippets,
- Example API Request (and URLS)
- API Changelog
Make sure to use the correct test-environment Base URL!
Base URL test system: https://test.saferpay.com/api
More Info on how to build the correct API URLs can be found in the Saferpay documentation: http://saferpay.github.io/jsonapi/#integration > Building the correct API URL
Step 3: Integration into live system
You will receive all the required data to start integrating Saferpay into your live system after your live account has been successfully set up. You will receive an email from our Customer-Team containing the following data:
- Live Saferpay username (eg. „e24xxxx001“) for the Saferpay Backoffice
- Live Saferpay Initial Password for the Saferpay Backoffice - This password will be only used once, you will be prompted to define a new password after your first login. Please make sure to use only the newly created password for future logins
- Live Customer Id - Your Customer Identification number
- Live Terminal Id(s) - The virtual terminal identification number on which the different payment methods are activated. Different terminals might have different PaymentMethods activated depending on your business needs. Different Terminals might also be used for different webshops, entities or services
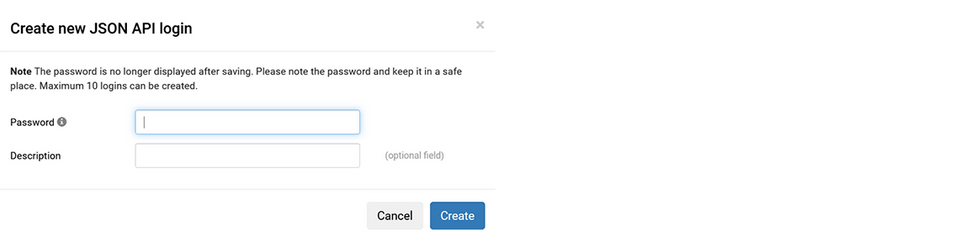
3.1 Creating JSON API authentication credentials
For your system to successfully communicate with Saferpay API you need to create either a JSON API Basic Authentication Credentials or Client Certificates.
Use your Saferpay username and the corresponding password to login into the Saferpay Backoffice to create the JSON API credentials or client certificates.
After successful login, navigate to “Settings” and then either to “JSON API basic Authentication” or “JSON API client certificate”*.
JSON API Basic Authentication

JSON API Client Certificate

3.2 Switching your integration from test to live mode
After creating the JSON API credentials or a JSON API client certificate, you simply have to replace your test data with the live data.
-
Add (or replace) your live data in the Saferpay plugin in your Shop backend.
The following data is required:
- Live-Customer ID
- Live-Terminal ID (eCommerce Terminal)
- Live JSON API username
- Live JSON API password
! Please make sure that the plugins operation mode is switched to “Live mode”
Plugin live (Example: WooCommerce):

Notice: The above screenshot displays the WooCommerce plugin settings. Other Shop plugins might look different; they however require the same data.
For a more detailed description of the plugin integration with Saferpay, please visit our partner customweb official plugin website and select your desired Shop system.
-
Replace the test data with live data in your codes/scripts. These are the following values that needs to be replaced:
- Customer ID
- Terminal ID (eCommerce Terminal)
- Authentication values
- Base 64 encoded Basic Authentication
> JSON API username
> JSON API password
- Or client certificates - API Request base URL
Base URL production system:
https://www.saferpay.com/api
More Info on how to build the correct API URLs can be found in the Saferpay documentation: http://saferpay.github.io/jsonapi/#integration > “Building the correct API URLs”
3.3 Configuring third party payment methods
Make sure to configure third-party payment methods in case you want to integrate them with Saferpay. Please also take notice of the special features of these third-party payment methods.
These are the third-party Payment methods that need to be configured before they can be integrated with Saferpay:
- Paypal (configuration guide)
- Sofort by Klarna (configuration guide)
- Paydirekt (configuration guide)
- Billpay (configuration guide)
- Postfinance (configuration guide)
Step 4: Testing of live integration
You should intensively test your live integration with real cards and payment details to verify the correct end-to-end set up and functionality.
Our Integration team will kindly assist you should you have any issues or any further questions regarding the integration.
Step 5: Go Live
After successfully intensively testing the live integration, you can officially go live.
In case you later encounter any issues with your already running system our Support-Team is at your disposal and will kindly assist you.